If you’ve ever found yourself nodding along to conversations about badge sizes, notches, paper stocks, or timing marks, while quietly Googling later, this article is for you.
In This Article:
- Simple definitions when it comes to event badge size, layouts, materials, and options
- Badge notches, lanyards, and accessories explained without the jargon overload
- How on-site badge printing works and why setup details matter more than you think
The Complete Event Badge Terminology Guide (2026)
At first glance, choosing the right event badges may seem like a simple task, but with all the different terminology and configuration options, it can all get pretty confusing, pretty fast. From badge sizes and material choices, to “notches” and print styles, there’s a lot of jargon to keep track of.
Whether you’re planning your first event or refining your conference check-in, registration, and onsite badge printing processes for the next one, understanding all the different options can help you make informed decisions to improve efficiency, avoid mistakes, reduce waste, and deliver a smoother attendee experience.
This guide breaks down the most common event badge terms you’ll encounter and explains what they mean, why they matter, and how they impact your event, from registration through on-site execution.
 Left: Attendees wearing 4×6 event badges at the Launch Tennessee 3686 Event; Right: 4×3 event badges on-site
1. Common Event Badge Sizes (and When to Use Them)
Badge size affects everything from readability to design and branding, to printer compatibility and lanyard choice. These are the most common sizes you’ll come across:
✅ 4″ x 6″ Event Badges
The most popular event badge size, hands down.
- Plenty of space for names, companies, QR codes, sponsor logos, and even agendas
- Easy to scan and read from a distance
- Ideal for conferences, trade shows, and multi-day events
✅ 4″ x 3″ Event Badges
A more compact option with a clean, minimal feel.
- Great for single-day events or quick check-in workflows
- Still large enough for names and scannable QR codes
- Uses less material while staying highly functional
While conference and event badges most commonly come in the standard 4 x 6 or 4 x 3 sizing, there are a few additional options you may come across:
3.5″ x 5.5″ Badges:
A less common, in-between event badge size.
- More space than a 4 x 3 but not a full 4 x 6
- Often used when working with legacy templates or specific design needs
CR80 (Credit Card Size):
Typically used for plastic ID-style badges.
- Familiar and compact
- Limited space for large names or multiple data points
- Common for staff credentials or controlled-access events
Plastic Pocket/Insert Badges (4.25″ x 6″):
Designed to hold a 4 x 3 paper badge as an “insert” inside a clear sleeve (or “pocket”) affixed to the plastic badge.
- Durable and reusable
- Common for recurring events or events that require plastic badges with onsite paper-badge printing for variable data, like names or QR codes
- Slightly larger to accommodate the pocket itself
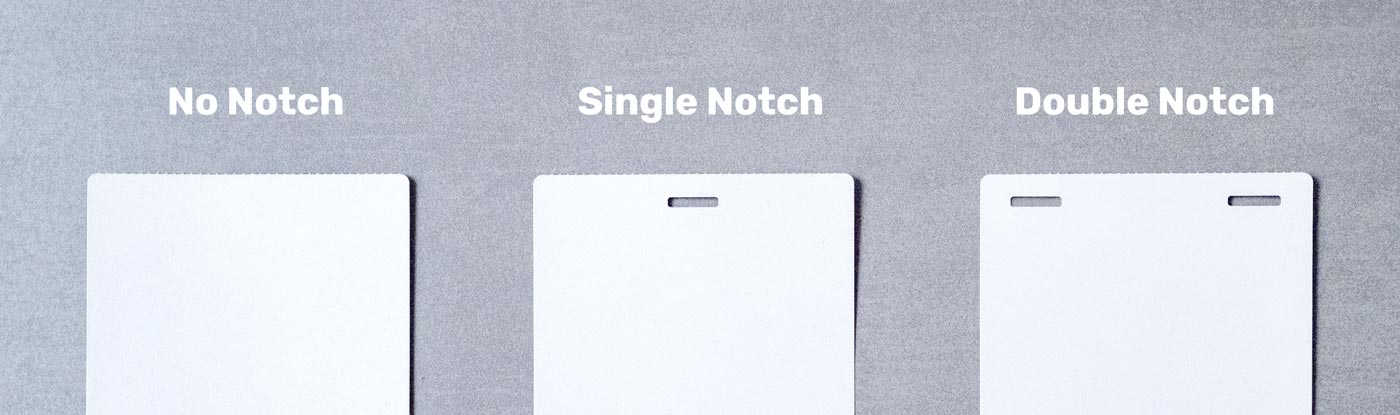
2. Event Badge Notches: A Small But Important Detail
Your event badge notch (or multiple notches) determines how the badge attaches to a lanyard or holder, and how it behaves when worn throughout the day. Below are the most common event badge notch configurations and why to use each:
✅ No Notch
- Requires a separate badge holder
- Common for plastic cards or insert-style badges
- Common for 4 x 3 event badges to maximize space, in conjunction with a badge holder
- Adds flexibility, but also an extra component
✅ Single Notch
The most popular event badge notch style.
- Compatible with single-attachment lanyards (see more below)
- Allows the badge to flip easily, which is helpful when the back includes different information, session agendas, or instructions
- Simple, versatile, and widely supported
✅ Double Notch
Designed for double-attachment lanyards.
- Double attachment lanyard keeps the double notch badge facing forward at all times
- Ideal when consistent visibility matters (names, access levels, scanning)
- Often preferred for exhibitors, staff, or events where the back-of-badge does not require easy access
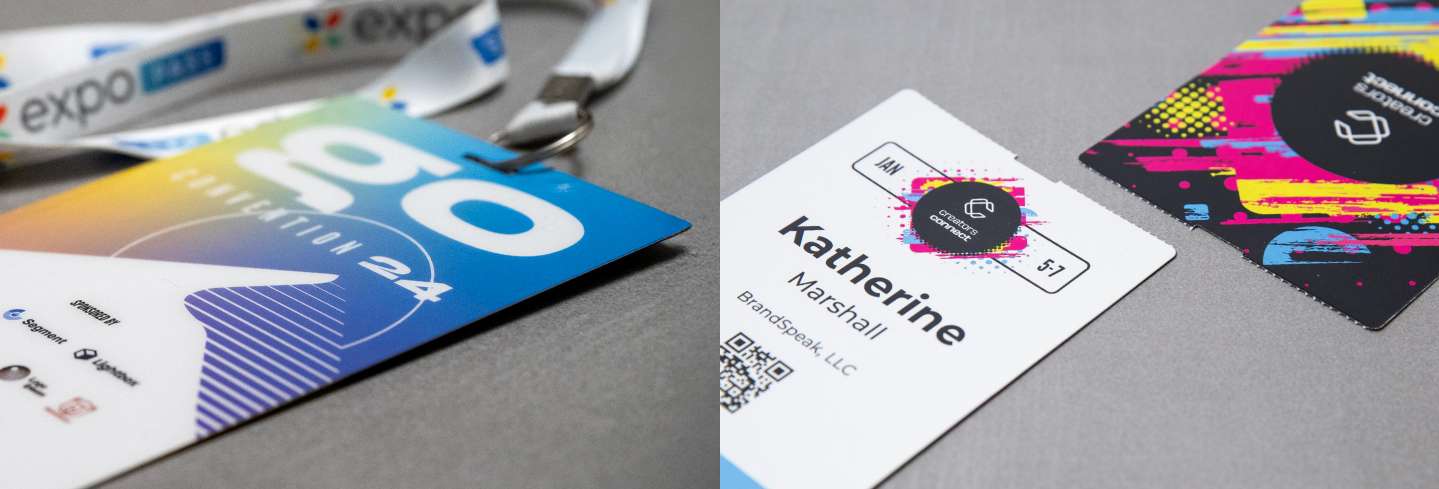 Left: Plastic Event Badge; Right: Paper Event Badges
3. Event Badge Material Terminology & Options
Okay, we may all have a general understanding of paper versus plastic event badges, but what about the fine print? Here are a few key terms to know when it comes to choosing your badge material:
✅ Paper Event Badges
Paper badges have become the go-to option for on-site event badge printing, especially as new lamination techniques and better quality materials have increased their durability and finished feel. When it comes to paper badges, it helps to understand the following:
- “Stock” refers to the paper material itself and its thickness
- Thickness is measured in points (pt): the higher the number, the thicker (and sturdier) the paper
- 9.5pt stock is considered an optimal thickness that’s durable enough for multi-day wear, offers a premium-quality feel, and feeds reliably through on-site printers. Beware of lower pt stock, which may result in flimsy badges and a less professional feel.
- “Thermal” or “Direct Thermal” stock refers to a coating on the paper that makes it compatible with high-end direct thermal printers, like the Zebra printers included in Expo Pass on-demand badge kits. These printers use a heat-transfer process rather than inks used in standard inkjet printers, resulting in: ➡️ Faster, more reliable printing; ➡️ No ink, no smudging or mess; ➡️ Premium polished and finished feel
✅ Plastic Event Badges
Plastic badges have long been the standard for professional multi-day conferences and events, especially those that pre-print their event badges.
- Thickness measured in mil (thousandths of an inch)
- 30 mil is the industry standard, making for a badge that is rigid and durable (comparable to the thickness of a credit card).
- Plastic badges are not compatible with direct thermal printers, and require additional options when paired with an on-site badge printing solution (such as pocket/insert badges or on-site sticker prints)
![]()
4. Badge Layout & Print Styles for On-Site Printing
For modern events looking to capitalize on the advantages of on-site (or “on-demand”) badge printing, here are some key terms to know:
✅ Badge Shells (Fanfold Stacks)
Most on-site badge printing solutions work on a hybrid setup, where your full-color badge designs are printed ahead of time (commonly called “badge shells”) and then fed through a printer on-site that adds the variable data (like attendee names, QR codes, company, etc). This setup eliminates pre-sorting, reduces waste, and allows last-minute registrations and info updates with ease.
“Badge shells”
- Pre-printed with branding, sponsors, and static design elements
- Folded into a continuous fanfold stack
- Fed into a printer on-site
- Individual attendee data printed live, typically using thermal printing
✅ Timing Marks (Folded Badges)
“Timing Marks” refer to black marks on the back-side of a badge that an on-site printer can sense to accurately make a cut.
Sometimes referred to as “butterfly” or “fan-fold” badges, Timing Mark badges are commonly printed with two mirrored halves — one upside-down relative to the other — then folded in half along a perforation to simulate a front-and-back layout. (This is also where some confusion around the term “fanfold” can arise, since it’s used to describe both this badge format and the entire stack of badges.)
“Timing Mark Badges”
- Front and back content spans two connected badges
- Folded in the middle
- The back is often blank except for timing marks
- Printers use these marks to align text and trigger cuts
✅ Double-Sided Badge Printing (No Timing Marks)
Pioneered by Expo Pass, this technology supports true double-sided on-demand badge printing, allowing both sides of the badge to be used without doubling materials.
- Reduces material waste by half compared to folded formats
- Printer senses notch placement to align text and trigger cuts
- Eco-friendly option
Looking for more info on on-site badge printing and badge layouts?
The Expo Pass Badge Printing 101 series offers a great introduction to on-site badge printing, including what factors you should consider when making the switch, plus a detailed breakdown of best practices and tips on how to design your on-site event badge.

5. Event Lanyards: Attachments, Materials, and Printing
Conference lanyards go hand-in-hand with your event badges, but can also add to the confusion once you get into the weeds of having to choose between the various options. Here’s a quick rundown of the common terms you’ll come across:
✅ Attachment or Clip
“Attachment” and “Clip” are two terms that get used interchangeably when discussing event lanyards, and refer the the mechanism used to clip your lanyard to your event badge.
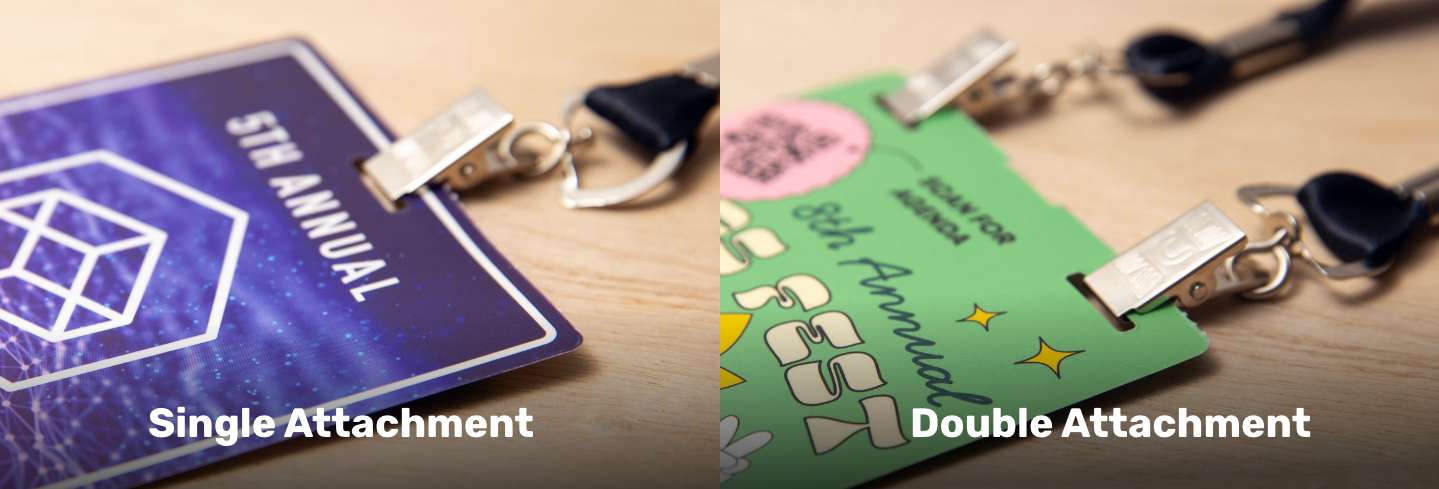
- Single attachment: One clip; pairs with single-notch badges or holders
- Double attachment: Two clips; pairs with double-notch badges or holders, and prevents flipping
✅ Attachment Types
While there are many different types of event lanyard attachments, the most common are:
![]()
- Bulldog Clip: A flat, spring-loaded metal clip that grips the badge slot securely and is commonly used with single-notch event badges.
- Lobster Claw: A swivel metal clasp that snaps onto a badge slot, offering a secure hold with easy attachment and removal.
- Split Ring: A small metal ring (similar to a keyring) that threads through a badge hole for a more permanent, tamper-resistant attachment.
- J-Hook: A simple metal hook shaped like a “J” that slides into a badge slot for quick attachment and lightweight use.
- Plastic J-Hook: A molded plastic version of a J-hook that offers a lightweight, cost-effective attachment option for short-term events.
✅ Lanyard Materials
Common options include:
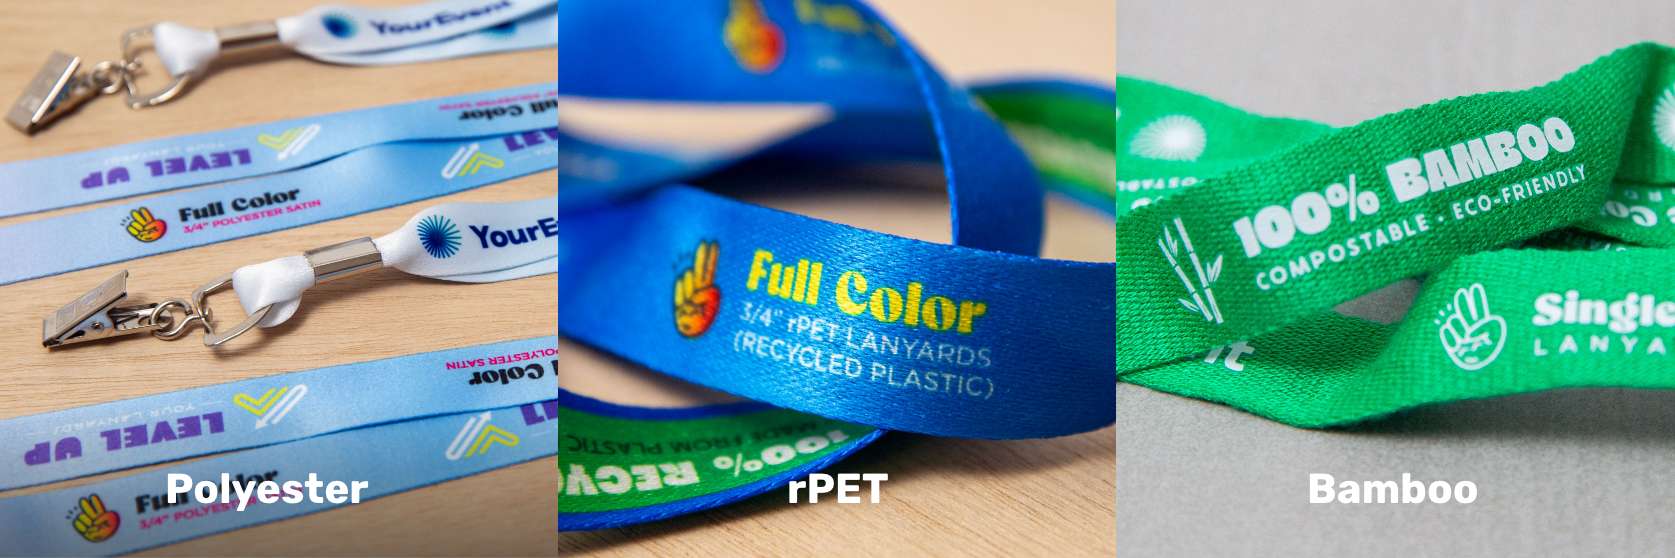
- Polyester: A durable, affordable synthetic fabric that’s smooth, comfortable, and widely used for full-color printed event lanyards.
- rPET (Recycled Plastic): A sustainable polyester made from recycled plastic bottles, offering the same look and performance as standard polyester with a lower environmental impact.
- Bamboo: A natural fiber material known for its soft feel and eco-friendly appeal, often used for premium or sustainability-focused events.
- Nylon: A strong, slightly glossy synthetic material that resists stretching and wear, making it ideal for long-term or heavy-use credentials.
- Cotton blends: Natural or mixed-fiber options that provide a softer, fabric-like feel, often chosen for comfort, specialty branding, or alternative aesthetics.
✅ Printing Methods
- Dye sublimation (full color): Prints any design, color, or pattern onto blank fabric
- Screen printing (single color): Logos or text printed on solid-color lanyards
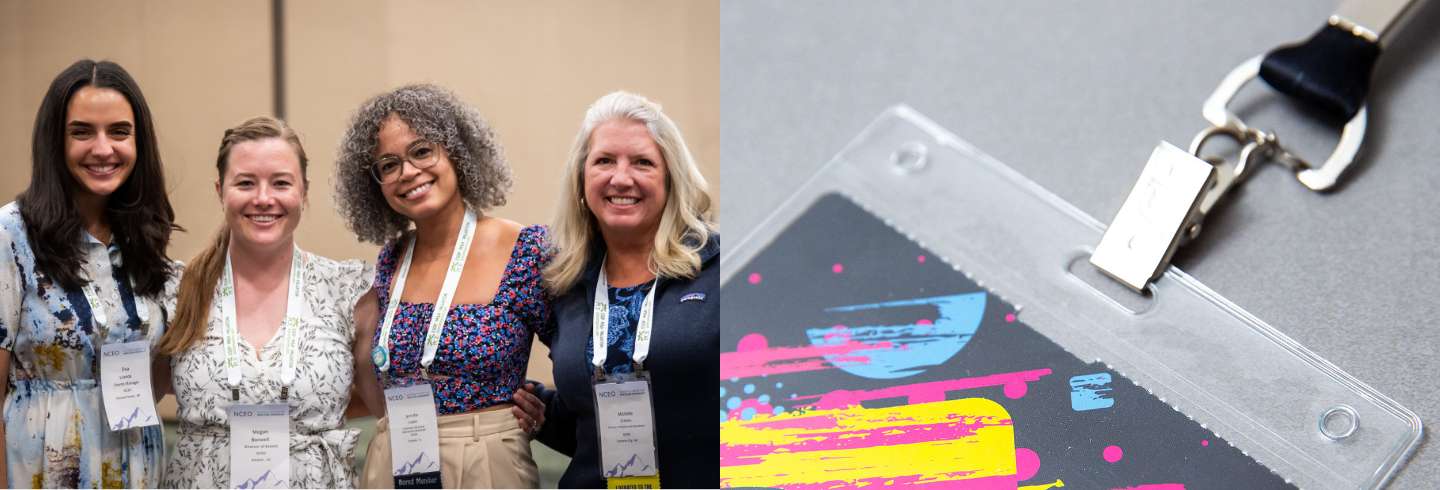 Left: Badges in Holders with Ribbons at NCEO Conference; Right: Closeup of Badge Holder & Bulldog Clip
6. Badge Accessories: Holders, Ribbons, and More
We’ve covered most of the key conference badge terms, but here are a few bonus ones related to event badge accessories!
✅ Badge “Holders” or “Sleeves”
Clear plastic sleeves that add protection and structure, commonly paired with paper event badges when multi-day use is required.
- Available in single or double-notch options
- Paper badge slips inside for improved durability and security
- Often required for no-notch paper badges
✅ Other Badge Accessories & Add-ons
- Badge Ribbons: Small adhesive strips attached to badges to highlight roles like VIP, Speaker, Sponsor, or Staff at a glance (or other “fun” themes).
- Retractable Reels: Spring-loaded badge holders that extend and retract, allowing more flexibility to badge scanning.
- Magnetic Fasteners: Two-piece magnetic attachments that secure badges through clothing without clips or pins.
- RFID: Radio-frequency identification (RFID) uses electromagnetic fields to create unique tags/identifiers for contactless scanning via radio waves.
Wrapping It All Up
We hope this guide has been a helpful resource for demystifying the world of event badge terminology! From badge sizes and materials to notches, layouts, and accessories, we covered the building blocks that go into creating badges that look great and work reliably on-site.
With the details dialed in, you can avoid costly mistakes and deliver a polished check-in experience your attendees will appreciate from the moment they arrive.
Event Badge Terminology FAQ
What is the most common event badge size?
4″ x 6″ badges are the most widely used because they balance readability, branding space, and scannability.
What does badge “stock” mean?
Stock refers to paper material and thickness. For event badges, 9.5pt stock is considered an ideal balance of durability and print quality.
What’s the difference between single- and double-notch badges?
Single-notch badges attach to single-clip lanyards and can flip easily. Double-notch badges attach to two-clip lanyards and stay facing forward.
What are “timing marks” on event badges?
Timing marks are printed indicators that help certain printers align text and know where to cut badges during on-site printing.
Can event badges be printed on-site?
Yes! On-site badge printing is a great way to streamline your event registration and check-in experience, while delivering polished and professional badges for attendees. For more on how the process works and why event organizers choose on-site badges over pre-printing, check out this resource.

