In This Article
- Best practices for event badge layout: choosing the right size, notch setup, and single vs. double-sided formats for your conference badges.
- Smart ways to weave in your branding while keeping attendee names and QR codes front and center and scannable with ease.
- Print-savvy design tips from bleed, trim, and safe areas to thermal-printing know-how that help badges land looking clean, polished, and professional.
Badge Printing 101: How to Design the Perfect Event Badge
(and Make Your Branding Pop)
What makes a great event badge design?
Your event badge is so much more than just a nametag! It’s a mini poster for your brand, a networking tool, and often the first thing attendees interact with. A great badge design can streamline your check-in process, boost sponsor visibility, and make your event feel polished from the start.
In this second installment of our Badge Printing 101 series, we’ll walk through everything you need to know about event badge design, from layout and branding to scannability and printing best practices, so your badges don’t just work, they wow.
New to on-site badge printing? Start with Part 1: What Is On-Site Badge Printing (and Why Are So Many Events Making the Switch)?
1. Start with the Right Badge Format and Layout
Before diving into design, the first thing you’ll need to do is choose the best badge format for your particular event. The primary decisions you’ll need to make are the badge size, notch configuration, and whether you’ll print single or double-sided for your badge shells, which will impact your layout, imprint area, and how the badge functions during the event.
Common Badge Sizes
- 4″ x 6″ – Vertical; ideal for modern events with plenty of space for branding, longer names, important info, and QR codes
- 4″ x 3″ – Horizontal; compact and traditional, but more limited for larger designs, extra info, or scan areas
Notch Configurations
- Single notch (centered): For use with standard single-clip lanyards
- Double notch: Designed for dual-clip lanyards to help prevent badge flipping
- No notch: Intended for use in plastic badge holders or sleeves
Single-Sided or Double-Sided
- Double-sided badges give you more space to work with. Many planners use the back of the badge for sponsor logos, agendas, maps, or helpful info like Wi-Fi passwords or emergency contacts. Others choose to print the same attendee information on both sides so names and QR codes stay visible no matter which way the badge is facing.
- Single-sided badges are more budget-friendly and work well for simpler events or where badges are inserted into plastic sleeves. With limited space, these designs focus on just the essentials—name, title, company, and a QR code—on one readable side.
![]()
What Is a “Badge Shell?”
We covered this in Part 1 of Badge Printing 101, but as a quick refresher: In most modern on-site badge printing systems, badges are printed on pre-designed “shells” that are professionally printed in advance with your event branding, colors, and sponsor logos. These shells reserve a blank “imprint area” where attendee data (like name, title, company, and a unique QR code) will be added on-site via thermal printer, meaning no ink and no mess. This method produces a premium badge with a refined finish, far superior to the quality and feel of badges printed entirely on-site using color inkjet printers.
“Think of your badge like a mini billboard! Weave in your colors, logo, and sponsors to turn every attendee into a walking ad for your event.”
— Kacie Ferguson, Director of Event Success, Expo Pass
![]()
2. Use Branding Intelligently (Not Just Decoratively)
Whether you’re hosting a trade show for 100 attendees or a corporate conference for 10,000, your badge is one of the most visible branding elements at your event. Here are a few ways to make this visibility count:
- Be sure to Include your logo, brand colors, and event name
- Add a hashtag, website, or your social handles to encourage sharing.
- If creating multiple badge designs based on ticket type (such as Attendee, Speaker, Exhibitor, Press, etc), be sure to maintain visual consistency. Consider using colors or design elements to help distinguish these differences from afar, while maintaining a cohesive look and feel for your event.
Since every guest will have their badge on display (including photo-ops and video/webcasts), a well-designed badge can strengthen your brand and elevate the polish and professionalism of the event as a whole.
Of course, while promoting your event’s brand is important, don’t get carried away! That’s where the next tip comes in:
![]()
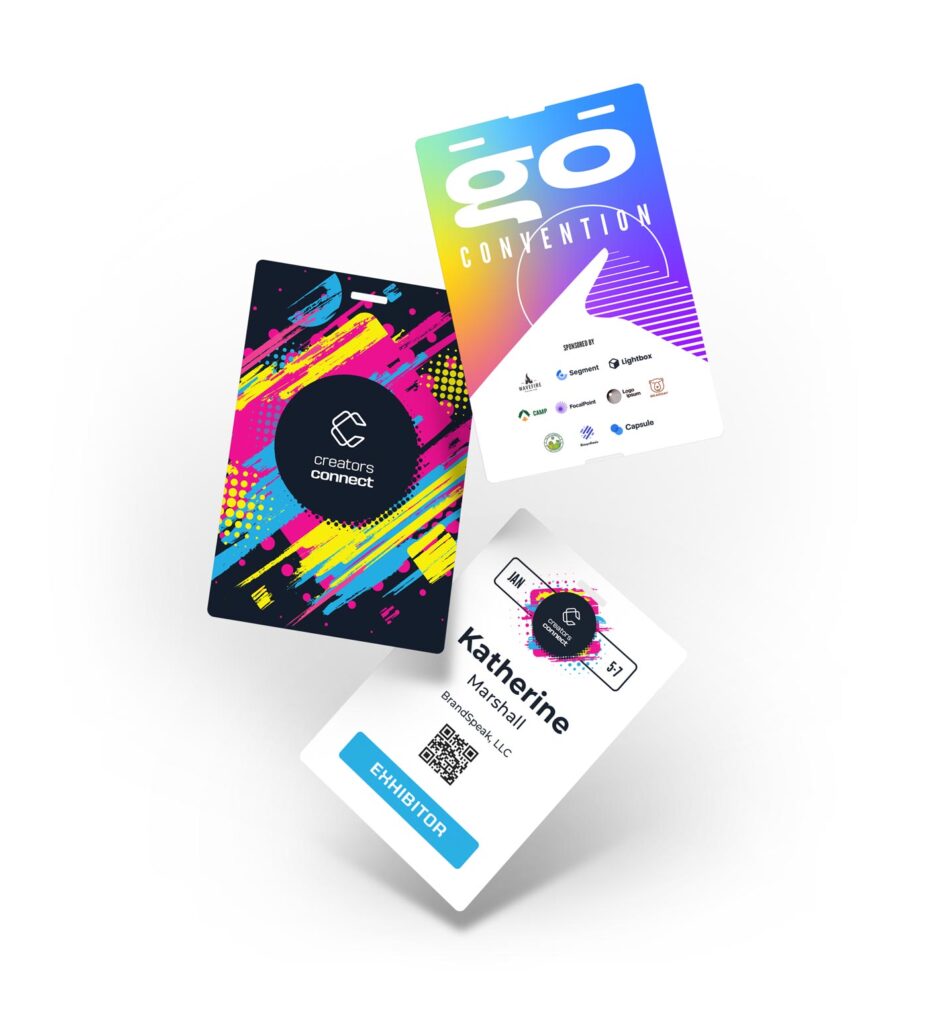
3. Make Sure To Keep Attendee Info the Focus
Badges are a great place to highlight your brand and sponsors, but don’t lose sight of what they’re really there for: Showcasing your attendee info, plus all the important utility that comes with it, from session check-in to CE/CEU tracking, lead retrieval, access control, and more. That’s why it’s critical to make attendee info easy to read and easy to scan.
On the side of your badge that will include attendee information, be sure that your brand elements (logo, sponsors, website, etc), aren’t overly dominant, and that you leave an appropriate amount of space for key Attendee data:
Best Practices
- First name should be most prominent (28-48pt font)
- Last name, title, and company slightly smaller (14-24pt)
- Use clean, easy-to-read fonts (sans-serif fonts such as Helvetica, Arial, Gotham, Open Sans, and Montserrat are commonly available and known for their legibility at various sizes).
- Use consistent alignment for readability, such as center-aligning the Name, Info, and QR code.
- Reserve a 0.8″ x 0.8″ or larger area for QR code, with 0.25″ padding on 4” x 6” badges. QR codes and spacing can be slightly reduced to fit on a 4” x 3” badge if needed.
- Avoid placing QR codes near notches or clip areas
💡 How big of an area should I leave blank on my event badge for the on-site imprint layer?
If you’re utilizing on-site badge printing, the amount of space required for the imprint layer on your badge shell design will depend on what data you plan to print on-site, such as First Name, Last Name, Job Title, Company, and Location. These days, individualized QR codes have also become an industry standard for streamlining session scanning and lead capture, which require additional space.
As a rule of thumb, it’s a good idea to leave a minimum of 3.5” wide x 2” tall blank imprint area. However, a larger area of 3.5” to 4” tall is generally recommended if using a 4” x 6” badge, to provide ample room for multiple lines of attendee data plus a QR code.
Smaller 4” x 3” badges give you less room to work with, and often require adjustments such as placing a QR code to the side of your attendee info rather than above/below.
“Your badge is prime networking real estate! Keep the design clean, let names shine big and bold, with clear fonts that make your names pop at first glance.”
— Kacie Ferguson, Director of Event Success, Expo Pass
![]()
4. Offer Value to Sponsors
Beyond being a great place to promote your own brand, badges can provide valuable visibility for sponsors as well. Think of your badges like swag that every attendee not only gets, but will wear throughout the event, be photographed in, and constantly refer to as they check-in to sessions and meetings throughout the day.
As a value proposition to sponsors, consider:
- Placing sponsor logos at the bottom of your badge design, or even offering the entire back side as advertisement space
- Using a “Presented by” line for title sponsors
- Running sponsored promotions, giveaways, or contests with the info printed directly on your badges
Just be sure sponsor logos feel integrated with the overall branding of your event, and don’t overly compete with attendee info visually.
⚡ Pro tip: If using on-demand badge printing, depending on your on-site equipment provider, you may also be able to extend your sponsorship opportunities to your check-in kiosks. Companies like Expo Pass provide customizable iPad check-in kiosk templates to feature your branding and sponsorship logos to attendees at check-in.
![]()
5. Design with Printing in Mind
Know Your Print Zones: Bleed, Trim, and Safe Area
To ensure professional results, you should be familiar with the industry-standard print terminology as you head into creating your design:
- Bleed area: This refers to the design area beyond the edges where the badge will be trimmed. Typically, the bleed area for badges extends 0.125″ (or ⅛”) beyond the final trim size to ensure that artwork prints to the edge of the badge without white borders, even with minor trimming shifts that might occur in the print process.*
- Trim line: This is the edge of the final badge, where the printer will cut (for example, 4″ x 6″ or 4” x 3”).
- Safe area: This is an area or boundary typically indicated on design templates where it’s recommended to keep all important text, logos, and QR codes in case of minor alignment or cropping issues with the printer. Generally, the safe area will be at least 0.125″ (or ⅛”) inside the trim line and notches.
*Not all badge printing providers offer “full-bleed” (or edge-to-edge) printing, and may require white edges on the top and bottom or all sides of your badge design. Premium badge printers, such as Expo Pass, offer full-bleed, high-quality prints. Be sure to confirm your print specs when submitting artwork to your provider.
✅ How to Design for On-Demand Badge Printing and Thermal On-Site Imprint Layers
If you’re using on-demand badge printing technology that uses a thermal printer to add attendee data and individual QR codes on-site (such as with Expo Pass), your badge shell layout should be optimized to print cleanly and consistently. Here are a few general guidelines:
- Avoid background colors and gradients in the imprint area
- Make sure your thermal imprint software and printer is set to use legible fonts at a large enough size to read easily
- Keep variable data away from edges, folds, or notches
It’s always best if you are able to preview your variable data ahead of your actual event to be sure that your settings work consistently and there aren’t unexpected layout or formatting issues (such as long names that go outside of your print area, or company names that run onto multiple lines). The best on-site badge printing software providers, like Expo Pass, offer integrated and flexible preview tools that let you see how your actual attendee data will appear on your badge to avoid last-minute complications or surprises.
For even more details and helpful info, check out this help center article from Expo Pass.
![]()
6. Use the Right Tools to Create Your Badge Design
Once you’ve mapped out your badge type, layout, and imprint zone, plus your plan for branding and sponsorship, it’s time to actually design your badge!
Whether you have a graphic designer or are DIY-ing it, using the right tools and knowing the formats is crucial.
Common Software for Badge Design
- Adobe Illustrator – Industry standard for vector-based design (more on what that means in a minute)
- Canva – Easy and intuitive for non-designers, but limited export options
- Figma/InDesign – Great for teams or advanced layout needs
If you’re looking for an accessible option, or don’t subscribe to the paid options above, some badge printing platforms, like Expo Pass, offer online badge design tools built for ease of use. Expo Pass’ drag-and-drop Badge Designer Tool lets planners lay out logos and design elements, set up imprint areas, and even preview how their actual attendee data will appear, taking out the guesswork and ensuring a professional and polished result.
More Key Design Terms to be familiar with:
🖼️ Vector vs. Raster
Vector files scale cleanly without loss of quality. Use vector files (.AI, .EPS, .SVG, or print-ready PDF) for logos and design elements.
Raster refers to images with set pixel data, meaning they can get blurry if scaled bigger than their original size. If using raster images (usually .JPG, .PNG), ensure they are at least 300 DPI (dots per inch) to avoid blurry or pixelated prints.
🎨 CMYK vs. RGB
For print, always design in CMYK color mode. RGB is for digital screens and can lead to color discrepancies in print.
7. Bonus Info (Good to Know): What Does “Fanfold” Mean?
As you set out to design and print badges, you’re likely to come across the term “fanfold,” but may not be sure exactly what that’s referring to. We’re here to help! Paper event badges are typically printed in a stacked format known as a fanfold. These stacks are commonly two badges wide (for 4″ x 6″) or four badges wide (for 4″ x 3″), measuring a total of 4″ x 12″. This stack is then fed into your on-site thermal badge printer, which prints the attendee’s data and then slices each badge apart for immediate use.
The following technical distinction usually doesn’t affect the event organizer directly, but it’s helpful to understand when selecting a badge printing provider or discussing format options:
![]()
Folded or Mirrored (Timing Marks)
These badges, often referred to as butterfly or fan-fold badges, are printed on a single sheet with two mirrored halves — one upside-down relative to the other — then folded in half along a perforation to simulate a front-and-back layout. These include “timing marks” on the back to help printers align and cut accurately. (This is also where some confusion around the term “fanfold” can arise, since it’s used to describe both this badge format and the stacked badge feed used in thermal printing.)
Single-Badge (No Timing Marks)
Other providers can print front-and-back on a single piece of badge stock, with no folding necessary. Printers use notch placement rather than timing marks to align and cut each badge accurately. This format, pioneered by Expo Pass, reduces material waste by half compared to folded formats, making it a more eco-friendly and efficient solution.
![]()
Common Questions About Badge Design
What size should an event badge be?
The most common event badge sizes are 4″ x 6″ vertical and 4″ x 3″ horizontal. 4″ x 6″ badges offer more room for QR codes, branding, and attendee details, making them ideal for conferences, trade shows, and multi-day events. Smaller 4″ x 3″ badges are great for shorter events or where compact designs are preferred.
What information should be on an event badge?
A standard event name badge should include the attendee’s first and last name, company, and title. Many event organizers also include additional info such as pronouns, access level (VIP, Speaker, Exhibitor), and individualized QR codes for session scanning, lead retrieval, or check-in.
What is a “badge shell?”
A badge shell is a pre-printed badge design that includes your event branding, sponsor logos, and background design, with an area left blank for personalized attendee information to be added later. On-site badge printing solutions, like Expo Pass, use thermal printers quickly to add attendee names, companies, and QR codes to the blank area of paper badge shells during check-in. This approach combines visual polish with flexibility. Similarly, there are options out there for adding stickers on-site for plastic badge shells.
How do I make sponsor logos look good on a badge?
Use consistent sizing and clean placement. Position logos at the bottom or back of the badge to avoid cluttering attendee info or overlapping QR codes.
![]()
Download Free Event Badge Design Templates
Looking for a head start on your next conference or trade show? We’ve got you covered. Download free, professionally designed event badge templates tailored for different badge sizes and event types, including:
- 4″ x 6″ vertical conference badge templates
- 4″ x 3″ horizontal event badge layouts
- Customizable event badge shell designs with imprint zones marked
- Options for sponsorship logo placement
These event badge design templates are optimized for on-site badge printing, including recommended thermal imprint areas and QR code placement — perfect for planners organizing corporate events, non-profit conferences, academic summits, or tradeshows.
Save time, stay on brand, and ensure your event name badges look great and function flawlessly.
👉 Download your free event badge design templates to get started.
Coming Soon in Badge Printing 101
Next up in the series: Badge Printing 101: Paper, Plastic, and More — What Event Badge Material Options Are Best?

